Creating Your Toolbar
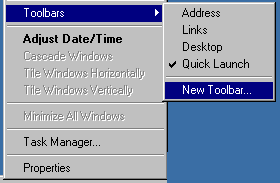
First, right-click on the gray area of the
Windows Task Bar at the bottom of your screen, move
your cursor to Toolbars>, then move your
cursor to New Toolbar and click (left-click). |
 |
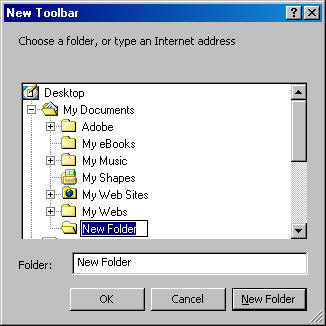
| The "New Toolbar" dialog will open.
Navigate to the place where you want to store your
new toolbar (My Documents might be a logical choice),
select it with a single click, then click the New
Folder. A "New Folder" icon will appear in
that folder. Right-click the "New Folder" icon and
select Rename. Then, type in a new name
for your new toolbar folder, such as "MyToolbar" and
hit Enter.
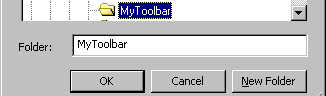
Finally, click once on your renamed folder and
it's name will appear in the "Folder:" line near the
bottom of the screen, then clickOK.

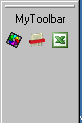
A new toolbar will appear on your Windows Task Bar |
 |
Relocating Your Toolbar
Mimimize all open windows so you can see your
entire desktop. Grab the vertical bar on the
left side of the toolbar and drag it to your
desktop. Release the mouse button.
The toolbar will appear as a large open window.
Now, grab the blue title-bar of this New Toolbar
window and drag it to the side of the screen where
you want to "dock" it. It will snap into
place. |
Configuring Your Toolbar
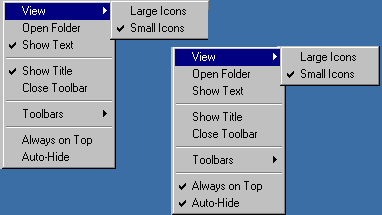
Right-click the toolbar and the pop-up menu will
appear.
Make the following changes (depending on your
preferences):
 | Uncheck "Show Text" |
| Uncheck "Show Title" |
| Check "Always on Top" |
| Check "Auto-Hide" |
|
 |
| Note that after
selecting "Auto-Hide", the toolbar may disappear.
Simply move your cursor to the edge of the screen
where the toolbar is and it will reappear. You can
also adjust the width of the toolbar by slowly
moving your cursor to the edge of the toolbar
closest to the center of the screen until it changes
from a pointer to a double-headed arrow. Then
drag the edge of the toolbar until you get the width
you want. A width of just enough for the icons
is recommended. |
Populating your toolbar
There are several ways to populate your toolbar:
| Drag icons from your desktop to the toolbar.
When you release the mouse, a small icon will
appear for that program. |
|

 |
| For items on your Start Menu or within My
Computer or Windows Explorer, right-click on the
item, select Copy, then right-click on
your desktop and select Paste Shortcut.
Then, you can drag the shortcut to the toolbar. |
| You can also add web sites, files, folders,
and other objects to your toolbar by similar
methods. |
|
Using your Toolbar
To activate a program from this toolbar, simply
left-click it once. |
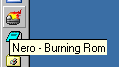
| When you hover your cursor over an
icon, the program name will be displayed. |
 |
| If you right-click an
icon and choose properties, you can see where it is
pointing and change it's icon. |
| You can move an icon on the toolbar
by simply dragging it to a new position. A
line will show the new position until you release
the mouse button. |
 |
| |
|
